March 15th approaching ... it was time for my regular tour of the Belgian summits again.
Also the Bergheimer Funkflohmarkt (hamfest) was held this weekend, so a visit was planned, and even more ... read on !
The summits with altitude of more than 500m give me some winter bonus points, so this year I decided to do only those, and leave the other summits for summer.
I may do a couple of those on my tour to Friedrichshafen in May/June.
Day 1
On Thursday March 8th, I left my home in the dark of the night at 05:30, clearly not early enough to avoid the traffic around Brussels and elsewhere ... and with a short stop for breakfast, I only arrived at my first summit with a considerable delay, at 09:10 local time. Time for the first activation of the day.
ON/ON-001 Signal de Botrange

What was a problem though ... was that I couldn't get my ground anchor into the ground, it was frozen !
After trying several other places, I finally planted it in a pile of snow, and it seemed to hold my 6m pole quite well.
The 9.15m endfed was attached to the top, and hung as a sloper to my umbrella, where the 9:1 UNUN and the KX3 were kept dry ... and the operator too , hi.

Only 11 qso's here, in about half an hour. Bands in use : 14, 10 and 5 MHz, strangely enough, I got no replies to my cq on 40m. In the meantime it had started snowing, so it was time to move on to the next summit.
PS : sorry to PA7ZEE ... because of the bad weather coming up, I missed his request to try 20m CW again. But I was lucky to work Geert on two other summits !
ON/ON-009 (Iverst)

I arrived at the summit around 11:00 local time. There was less snow there, and it was dry to set up. I used my 12m Spiderbeam pole this time, so the random endfed was setup as a vertical.
I was going to go up the bands in SSB , starting with 60m, then going down again in CW.
On 60m, I only heard G4WSB calling, but we couldn't make a qso.
Then a pile-up followed on 40m, resulting in 22 qso's in 18 minutes ... but then rain started pouring down, and I had to qrt before I could finish my tour of the bands ... also had no time to take pictures of my setup. Here all my stuff packed up to leave the operating spot.

Then a pile-up followed on 40m, resulting in 22 qso's in 18 minutes ... but then rain started pouring down, and I had to qrt before I could finish my tour of the bands ... also had no time to take pictures of my setup. Here all my stuff packed up to leave the operating spot.

So far for SOTA for this day, I had to do some shopping in Aachen, and find my AirBnB place in Würselen (where I had a very nice appartment with all amenities).
Day 2 was spent in a nice swimming pool/wellness center in Würselen, so we go directly to
Day 3
This was going to be an exciting day !
On the programme : a visit to the Funkflohmarkt in Bergheim, and in the afternoon a SOTA activation on the Sophienhöhe DM/NW-143.
On the programme : a visit to the Funkflohmarkt in Bergheim, and in the afternoon a SOTA activation on the Sophienhöhe DM/NW-143.
Now I had looked if there were any interesting presentations at the hamfest, but to my surprise ... there were NONE. So I had the idea of volunteering to give a short presentation about SOTA.
I got in contact with Simon, DL2KSB, and we agreed on two short presentations : one about SOTA in general, and one with a report on my Mallorca Trip of last year.
Of course, stupid me hadn't thought this through ... Simon expected me to give the presentations in German ! Now that was going to be an adventure in itself.
This was the announcement on their website, looks good, eh ?.


I arrived at the hamfest at 9:00, and Simon made sure I could put all my stuff in a safe place.
So I started by doing a tour of the two halls where the fleamarket was. I did buy some PowerPoles for my next projects, and some other small stuff. My main purchase was an original Junker key.
For SOTA work, I normally use paddles on the KX3, but at home I like to make a qso with a straight key every now and then, mainly as a member of the SKCC.
I was also pleased to see some homebrew stuff, like this Bitx40 transceiver, which I also built.

For SOTA work, I normally use paddles on the KX3, but at home I like to make a qso with a straight key every now and then, mainly as a member of the SKCC.
I was also pleased to see some homebrew stuff, like this Bitx40 transceiver, which I also built.

Then, at 11:00 it was time for my presentation. Some 10 - 15 people attended, and Iwas surprised that my German didn't seem so bad after all, at least nobody ran away from the conference room ... hi !
I explained the basic principles of SOTA, but when I opened my backpack to show what I take on a typical activation ... everyone seemed more interested.

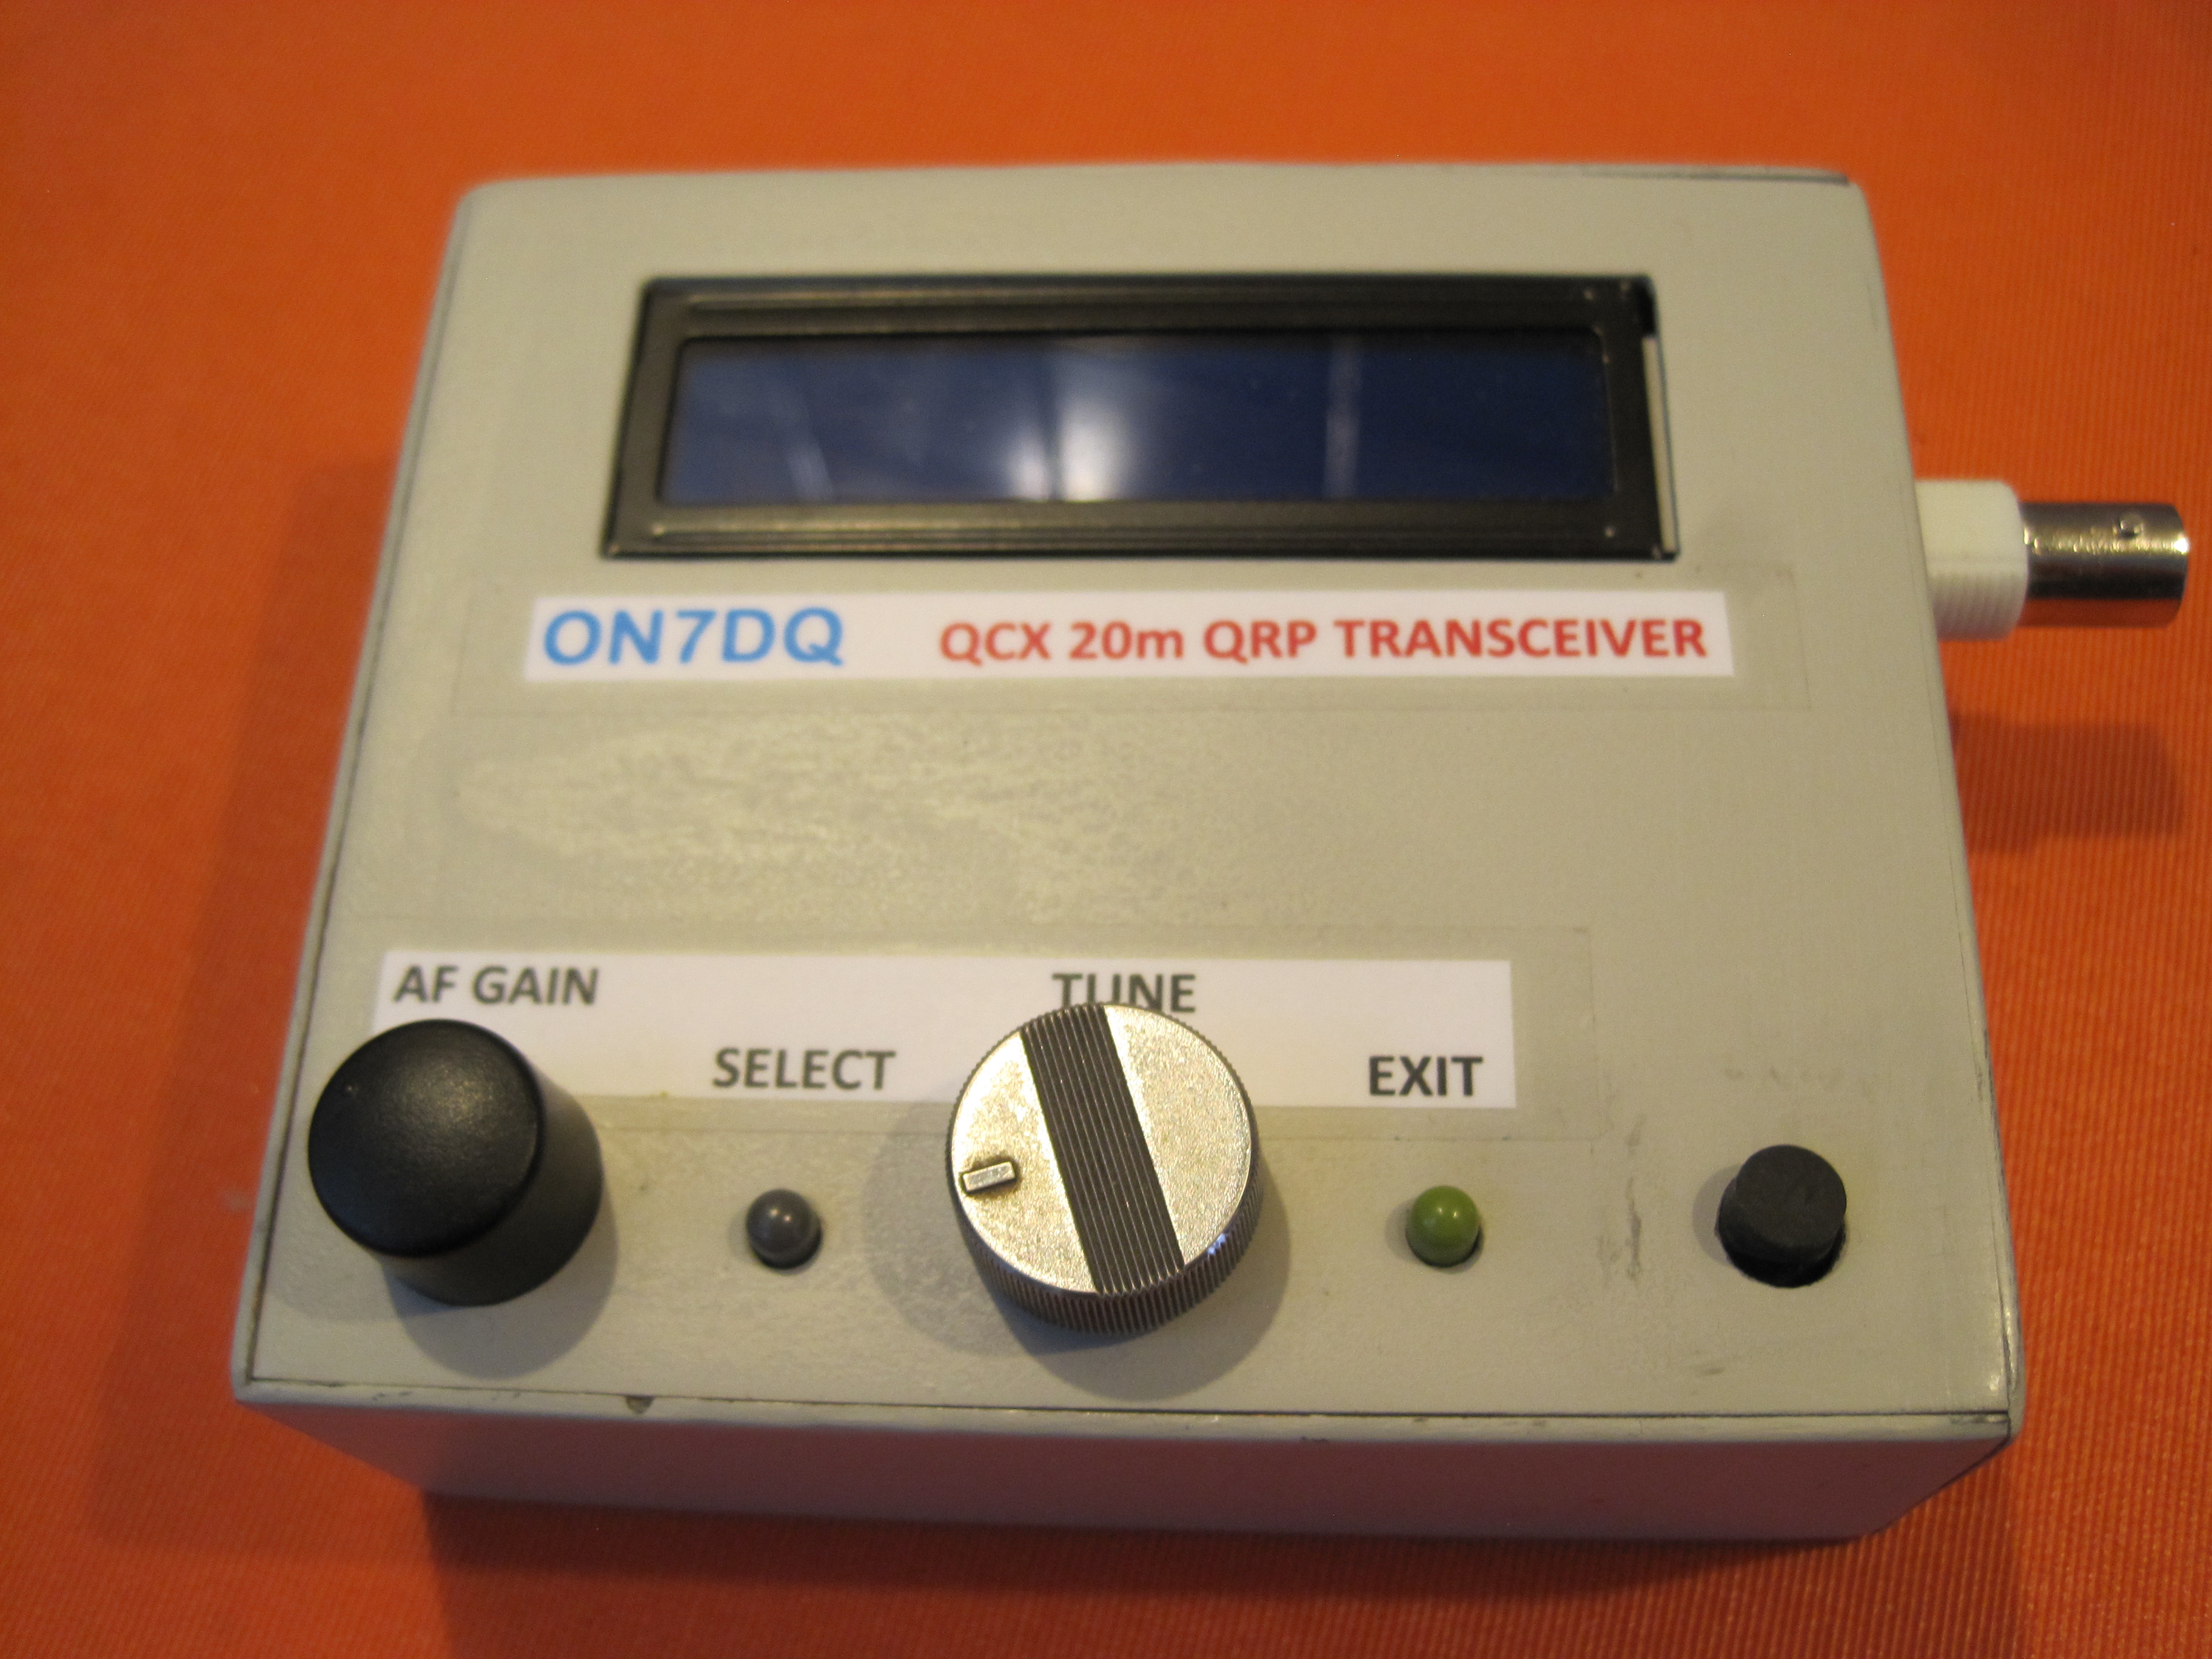
I showed the KX3, my endfed antenna with 9:1 UNUN, and all kinds of accessories I use, and of course my newest toy : the QCX transceiver.
After I finished, I had some nice talks with Jochen , DL4KCA (who is also a SOTA activator) and some others.

After the first part, we had a 30' break, and then came a little disappointment ... nobody showed up for my second part ! Well, 12:15 local time is probably not the best time for a presentation, right ?
The cafetaria was full of people though !
Anyway, I did not take it too heavy, if I left early for my summit, I would have more time or could finish a bit sooner.
Sophienhöhe DM/NW-143

Now, I had asked if any local hams would like to join me for a walk up the hill and having maybe their first SOTA activation. But nobody showed up .. so I left alone, for a 1 hour walk.
This was my second visit to the Sophienhöhe, and this time I started at the parking to the West, as suggested by Franz, ON9CQ. Parking position is here 50.926768, 6.421960.
I did not record the track, but this screenshot from Google Maps should get you to the summit without problems.

The Sophienhöhe is not really that high (301.8 m, and only 200m ascent from the parking), but it has steep slopes, so the trail is winding slowly up the hill, and it is a long walk.
Actually it seems to be the largest artificial hill worldwide, according to this source :
Sophienhoehe. So even though it is only one point for SOTA, it is still worth a visit.

I started the walk in my tshirt, since there was some sun and temperature around 15 °C .. but as we will see later, I ended in a raincoat and with a raincover over my backpack ... wx can change quickly on a summit !

At the summit there is a replica of a Roman lookout tower, and two nice benches, where one can setup. As you can see in the picture above, the weather was already changing ...
Now, this place is visited by a lot of people (walkers and mountainbikers), so if you prefer a more quit place, there is another interesting spot nearby, called Höller Horn, where there is a wooden ornamental tower. You cannot climb the tower, and it does not protect from the rain, but is maybe a good support for antennas.
NOTE : on some maps you will find an indication for the summit cross or "Gipfelkreuz". This location is NOT in the Activation Zone, because there is a saddle of more than 25m between this point and the summit.

I did set up near the Römerturm, and got only a few visitors this time. One of them was so friendly to take this picture from a distance.

I then started my activation, but after a while it started raining ... and I had to stop operating, with only 8 qso's in the log. Still not a bad result, if you consider that I made 3 S2S contacts, and two DX qso's with the USA.
After descent from the summit in the rain, I went shopping and found a nice Italian restaurant in Würselen, and with a pizza and a good beer*, the bad weather was quickly forgotten.
(*Yes I know, who drinks beer with a pizza ? Well, I do !)

Day 4
This sunday I had to leave my AirBnb place in Würselen, and move to another one in Bastogne for one more night before returning home.
Along the road, three more summits :
ON/ON-011 Sur Clair Fa
ON/ON-013 Bois de Hodinfosse
ON/ON-010 Baraque Fraiture
Since I have done all Belgian summits several times before, I had no trouble finding my favourite operating spots. The only trouble I had was with the weather. To make a long story short : a lot of rain, a little rain, mostly dry but cold wind, and more rain ... well, typical Belgian weather that is !
ON/ON-011 Sur Clair Fa

It was already raingin when I arrived at the summit, so it was time to test my "bothy bag" for the first time. This is a kind of mini-tent for two persons, but since I was alone, it would be difficult to keep it up. Also, I didn't have a walking pole to put into the little hole in the top.

I finally put my backpack in one side, and placed a small table and tripod stool at the other end, and pulled the bothy bag over my back, it kind of worked but was not too comfortable.

Anyway, I was dry and could operate !
I made 10 qso's , all in CW on 40m, and then was lucky to find EA5FV/P for a S2S qso on 14 MHz. Nice !
ON/ON-013 Bois de Hodinfosse

As I did before, iI drove up the forest track as far as my car would take me, and parked at the crossing of two forest tracks (see picture above). Had a sandwich first, and then started walking the steep path up the summit. WX was fairly nice, at least compared to the first summit !

I put my antenna along the track, and hid myself between the sparse trees ... it didn't help much against the cold wind :-(

The activation was quite a succes, with 24 qso's in the log.
Four of those were S2S, and to my surprise the very last caller on 14 MHz CW was Geert, PA7ZEE from Gran Canaria !
(Those that follow my adventures closely will already know I'm going to Gran Canaria EA8 in April/May ;-)
ON/ON-010 Baraque Fraiture

Here I operated from the parking lot, which was deserted, sonce most snow had already disappeared by now. But again , the soil was frozen, so I was lucky to still find a pile of snow to put my fishing pole into. It held up the whole activation.
Despite some light drizzle, I had a good activation with 32 qso's, with 3 more S2S, and well well, look who's there ... another call from PA7ZEE !
Day 4
ON/ON-004 Bois de Hazeille

This summit is very easy to find, it's just a drive up, to a spot behind the St.-Hubert radar towers.
Since I didn't have to walk a lot, I could set up my 12m Spiderbeam pole again, and use the random endfed as a vertical. Here the big ground anchor I use for the Spiderbeam pole, I was lucky that the ground was not frozen !
Also using my comfy folding chair ...everything was in place for a nice activation and ... "armchair" copy !

All went well for 26 nice qso's ... and then the rain chased me away again !
Bands in use were 20/40/60, and a mix of SSB and CW.
But I want to mention one special qso : I was able to use the 9.15m endfed on 80m, and worked HB9CGA on 80m CW.
Well done for such a simple piece of wire !
ON/ON-006 La Croix Scaille

This was the worst activation of my whole trip !
I arrived at the summit and rain was pouring down ...
I still had to eat a sandwhich, so I stayed in my car. And waited ... and waited ...
But it kept raining !
So I found a spot where I operated before in nice sunshine, but had to improvise now.
Hanging the 9:1 UNUN under a small "roof" over an information sign, to keep it dry, and using an umbrella for myself and the rig, I managed to setup as dry as I could make it. As an extra protection, I kept a towel over the KX3 all the time.

As such, I managed to make 13 qso's on 7 MHz, CW and SSB.
After putting all the wet stuff in the car ... I drove home, satisfied with another succesful SOTA trip ! See you all on the next one !
73 de Luc - ON7DQ